Image Making
- Details
- Written by: Ray Oltion
- Category: Image Making
- Hits: 5366
Buying a 3D printer this spring catalyzed several ideas, one of which was to build a movie camera that uses traditional 35mm film. Yes, this is rather retro, but I have plans to use the developed images in a movie set. I will print them in a strip and depict movement symbolically, rather than trying to fool the eye the way movies do with multiple frames per second. My camera will take one 9 x 12 mm frame every half second, so it will be "jerky" to say the least.
This project has given me lots of experience with 3D computer aided design, something I was always wanting to learn but never got up the nerve to try. The 3D printer helped push me into this technology because I wanted to design and print my own parts. I started with a GUI design tool called FreeCAD and did some cool things for my early designs. It became frustrating when trying to make revisions, though. That's when I decided to learn a code-based approach. I started with OpenSCAD and found that specifying design parameters at the top of a script and generating the parts via programming code was much better for iterated designs of complicated objects.
Lately I have adopted the build123d system that runs in Python. It has several major advantages over the other two tools I tried. One is that all shapes are defined mathematically via topological objects rather than approximated in 3D meshes, so dimensions are exact and you can calculate volumes for finished parts. You can also design parts individually in their own coordinate systems and then assemble them via pre-specified joints.
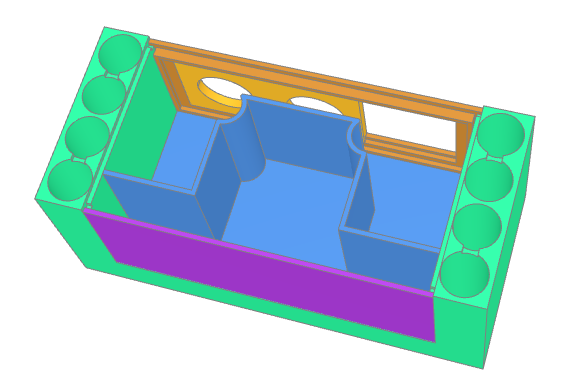
The images you see are part of the design process and represent stages in a multi-step project. The block model shows major component areas and how they fit together. That is necessary for making sure everything works together and that critical components are accessible during use. I started the design process with pencil sketches, and then drafted the major components in a 3-view drawing using Qcad. From those specifications I then recreated the design in 3D with FreeCAD, then OpenSCAD, and now once again in build123d.
The image showing the gears features a spur differential gear system that will drive both the film sprockets that move the film across the image plane and the gear that will wind the exposed film onto a takeup spool. (Click on the article title to see this image.) The differential allows a changing gear ratio, since the takeup spool will grow in diameter with successive exposures. This design was done with OpenSCAD, so this shows that you can make some pretty complicated devices with this system.
The project involves electronics as well as gears. One Nema 17 stepper motor (about 1 inch square and high) will fit in the inner compartment of the block diagram and will drive the film movement. Another tiny stepper motor will drive a shutter wheel that will expose the image on the film at about 1/120 second. The wheel has a 6 degree slit that will rotate twice per second, once for each frame. Do the math: 6 degrees is 1/60 th of a circle, and 1/2 second per rotation results in 1/120 second exposure. Cool, huh?
The batteries will supply power to a Arduino microcontroller that will coordinate the motors and provide on-off controls. There are also two rotary encoders that will measure the film movement and guarantee accurate placement of the film for each exposure.
Two CCTV lenses will form the image on the film plane. They are 12.5 mm and 25 mm focal length, for a "normal" and "telephoto" view. The sliding lens mount plate will make it easy to change lenses without unscrewing them.
The camera will be capable of about 90 seconds of movie at 1/2 second per frame. The 9 x 12 mm frame only takes up 1/2 of the film width, so it can be flipped over and run through again to expose the other side, making a total of three minutes of movie per 36 exposure film. I will shoot in black and white and develop and print the film myself.
I will follow up with more detail about the camera and its design in later articles.